
DockerMaze challenge write-up
UPDATE 23/11/2015: new info thanks to @nibble_ds, one of the challenge authors, inline the post 🙂
Last November 16-17th the Dockercon eu 2015 was held in Barcelona, and the Schibsted team published the DockerMaze challenge, a labyrinth escape game like those we used to play in the 90s. In the game you wake up alone in the middle of a labyrinth and you have to escape from it, and through a console you can use commands to interact with the environment.
In this post I will show how I had fun solving the challenge! 😀
The «help» command uncovers a set of commands that includes «look», «interact» and «escape». If you do «look front» the game says that there are some signs on the wall, and after executing «inspect wall» some clues are revealed:
Found rooms:- schibstedchallenge/dockermaze-weisse:latest- schibstedchallenge/dockermaze-stout:latest- schibstedchallenge/dockermaze-porter:latest- schibstedchallenge/dockermaze-ipa:latestFound Keys:- FollowTheWhiteRabbitFollowed path:- Input: https://challenge.schibsted.com/assets/data/ct1.bin- Output: ?More than a year and I'm still here. I'm loosing all hope. Maybe there is another key?
A quick inspection of the binary file doesn’t give much information.

Next step was to download the docker images and to inspect them:
docker pull schibstedchallenge/dockermaze-weisse:latestdocker pull schibstedchallenge/dockermaze-stout:latestdocker pull schibstedchallenge/dockermaze-porter:latestdocker pull schibstedchallenge/dockermaze-ipa:latest
Let’s play with those docker images then 🙂
WEISSE
docker inspect schibstedchallenge/dockermaze-weisse:latest
Relevant info:
"Entrypoint": [
 "/usr/local/bin/start.bash"
 ]
"ExposedPorts": {
 "1954/tcp": {}
 }
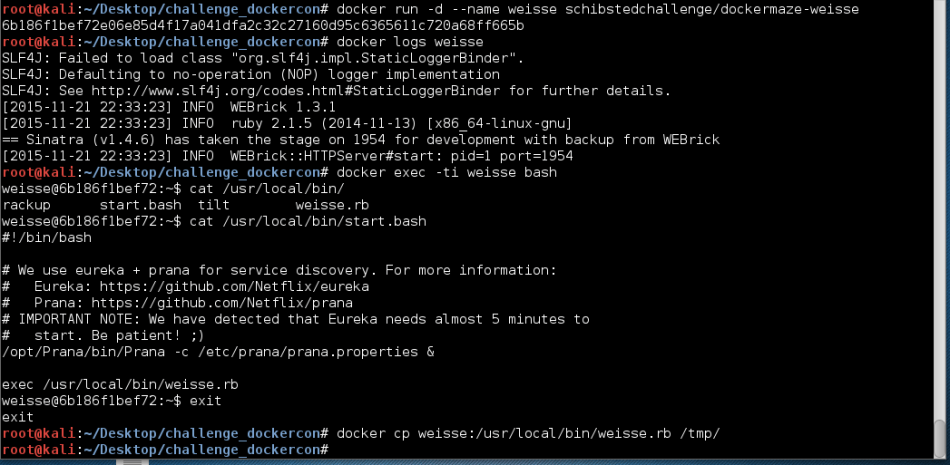
Seems that there’s a ruby application («weisse.rb») listening at the port 1954/tcp, that is executed by the bash script «start.bash». Inside that script additional information is given:
# We use eureka + prana for service discovery.
This clue will be useful later 🙂
Looking at the «weisse.rb» file I saw that the application exposes a REST endpoint («/turing») that runs the received data in an Enigma machine. Furthermore, to set up the enigma machine it tries to get some information making DNS requests to a host with name «porter».
Here are some snippets of it 🙂
...SNIP...BFBASE = 'aaa'set :bind, '0.0.0.0' set :port, 1954post '/turing' do data = request.body.read rotors = get_rotors('porter')plugboard = Hash[*PLUGBOARD.pack('H*').split('')] plugboard.merge!(plugboard.invert) rotors.map! do |r| Hash[[r].pack('H*').split('').zip((0...256).map{|i| i.chr})] end reflector = Hash[*REFLECTOR.pack('H*').split('')] reflector.merge!(reflector.invert) enigma(data, plugboard, rotors, reflector) end...SNIP...def get_rotors(nameserver) rotors = []Resolv::DNS.open({:nameserver=>[nameserver]}) do |r| ctr = 0loop do begin n = r.getresource("walzen-#{ctr}.dockermaze", Resolv::DNS::Resource::IN::TXT).data.to_i rescue Resolv::ResolvError break endbf = BFBASE.dup found_chunks = 0 rotors[ctr] = ''while found_chunks < n begin ck = r.getresource("walzen-#{ctr}-#{bf}.dockermaze", Resolv::DNS::Resource::IN::TXT).data.delete('"') rotors[ctr] << ck found_chunks += 1 rescue Resolv::ResolvError next ensure bf.next! end endctr += 1 end endrotors end...SNIP...
STOUT
docker inspect schibstedchallenge/dockermaze-stout
Relevant info:
"Entrypoint": [
 "/usr/local/bin/stout.py"
 ]
"ExposedPorts": {
 "31337/tcp": {}
 }
But an error is raised when trying to run the docker image:

As the container didn’t start due to the error, I changed the entry point of the container to be able to snoop the «stout.py».
docker run -ti --entrypoint /bin/bash --name stout schibstedchallenge/dockermaze-stoutdocker cp stout:/usr/local/bin/stout.py .
#!/usr/bin/env pythonimport os import sys import socket import base64 from datetime import datetime from dns import resolver from flask import Flask, request, make_responseapp = Flask('stout')PORTER_HOST = os.getenv('PORTER_PORT_53_TCP_ADDR')def xor(data, key): return "".join(map(lambda i: chr(ord(data[i]) ^ ord(key[i%len(key)])), xrange(len(data))))def transform(data): s = socket.socket() s.connect(('ipa', 6060)) s.sendall(base64.b64encode(data) + "\n") ret = s.makefile().readline().decode('base64') s.close() return ret@app.route("/gate", methods=['POST']) def gate(): t1 = datetime.now()data = request.stream.read()dns_resolver = resolver.Resolver() dns_resolver.nameservers = [PORTER_HOST] dns_answer = dns_resolver.query('bitwise.dockermaze', 'TXT') secret = dns_answer[0].to_text().strip('"')ret = transform(xor(data, secret))t2 = datetime.now()resp = make_response(ret, 200) resp.headers.extend({'X-Dockermaze-Time': t2-t1})return respif __name__ == '__main__': if not PORTER_HOST: sys.exit('error: cannot get key') app.run(host='0.0.0.0', port=31337)
What can be seen is that the script is publishing a REST endpoint that XORes the received data with a secret, obtained through a DNS request to the «porter» host (you have to provide its IP by an envvar), and sends the result to the «ipa» host.
PORTER
docker inspect schibstedchallenge/dockermaze-porter
Relevant info:
"Entrypoint": [
 "/usr/sbin/named"
 ]
"ExposedPorts": {
 "53/tcp": {}
 }
As suspected providing the info obtained from the «stout» and «weisse» containers, the porter looks like a DNS server.

Bingo! one of the entries present in the «db.dockermaze» dns zone configuration for bind contains the secret key needed by «stout.py» to work (between other relevant entries we’ll see below).
IPA
docker inspect schibstedchallenge/dockermaze-ipa
Relevant info:
"Entrypoint": [
 "/usr/local/bin/start.bash"
 ]
"ExposedPorts": {
 "6060/tcp": {}
 }
"Env": [
 "PATH=/go/bin:/usr/local/go/bin:/usr/local/sbin:/usr/local/bin:/usr/sbin:/usr/bin:/sbin:/bin",
 "GOLANG_VERSION=1.5.1",
 "GOLANG_DOWNLOAD_URL=https://golang.org/dl/go1.5.1.linux-amd64.tar.gz",
 "GOLANG_DOWNLOAD_SHA1=46eecd290d8803887dec718c691cc243f2175fe0",
 "GOPATH=/go"
 ]
The golang traces clearly point to @nibble_ds as one of the crime authors 😉
When trying to run the «ipa» image, an error is raised:
2015/11/22 12:20:20 error: envvar AES_KEY not defined
Let’s try to get more info of it:
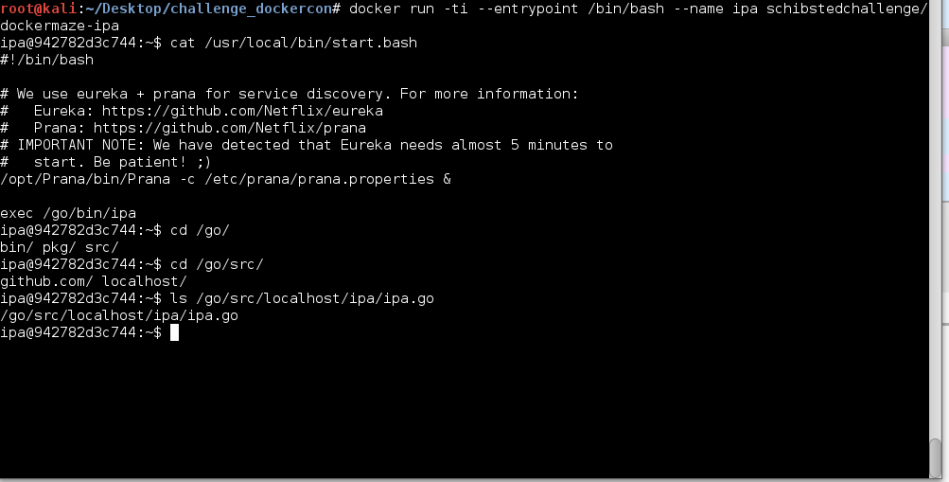
As can be seen the container also makes use of Prana and Eureka (parts of the Netflix stack), and runs a «ipa» golang binary. In this case, the challenge authors made our life easier giving us the source code too ;). In any case, the bin was not stripped.
$ file ipa
ipa: ELF 64-bit LSB executable, x86-64, version 1 (SYSV), dynamically linked, interpreter /lib64/ld-linux-x86-64.so.2, not stripped
Snooping the source code of the «ipa» application («ipa.go»), we can see that it listens to the port 6060/tcp, and decodes (base64) and decrypts the received data, using AES-256 CTR mode using a key provided by the environment variable «AES_KEY». The result is sent to the «weisse» REST endpoint and the returned data is base64 encoded and sent back to the caller.
Snippets FTW!
...SNIP...var AesKey = os.Getenv("AES_KEY")func main() {...SNIP...ln, err := net.Listen("tcp", ":6060")...SNIP...func handleConnection(conn net.Conn) { defer conn.Close()br := bufio.NewReader(conn) line, err := br.ReadString('\n')...SNIP...data, err := base64.StdEncoding.DecodeString(line)...SNIP... decdata, err := decrypt(data, []byte(AesKey))...SNIP...transdata, err := transform(decdata)...SNIP...ret := base64.StdEncoding.EncodeToString([]byte(transdata))fmt.Fprintln(conn, ret) }...SNIP...func transform(data []byte) (transdata []byte, err error) { c := goprana.NewClient(goprana.DefaultPort) resp, err := c.Post("weisse", "/turing", "application/octet-stream", bytes.NewReader(data)) if err != nil { return nil, err } defer resp.Body.Close()return ioutil.ReadAll(resp.Body) }
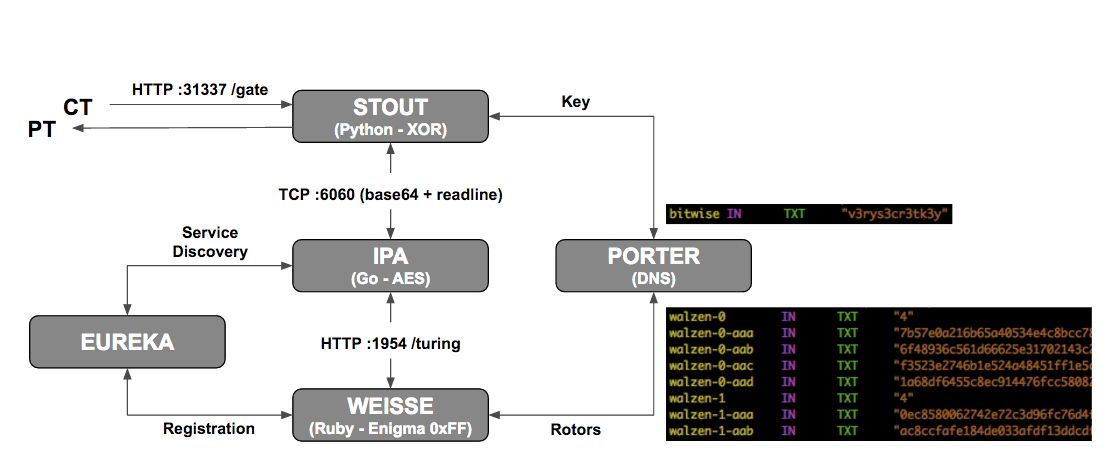
OK so, let’s put all the pieces together:
- The «stout» machine expects some data to be received by a POST HTTP method to its REST endpoint, listening at the 31337/tcp port. He gets a secret key from the «porter» machine (via DNS request) and after applying a transform to the received data, sends it base64 encoded to the «ipa» host.
- The «ipa» host receives the data sent by «stout», decodes it (base64) and decrypts it using the provided AES_KEY via envvar. Then sends the decrypted data to the «weisse» endpoint.
- The «weisse» endpoint applies an enigma decryption to the received data, getting information about the rotors through DNS requests to the «porter» DNS server, and returns the decrypted data to the «ipa».
- The «ipa» base64-encodes the response and returns it to «stout».
- The «stout» machine decodes the bas64 response and delivers it to the caller.
On the other hand we had the «ct1.bin» file and the «FollowTheRabbit» key, so we can make the below assumptions:
- The AES_KEY is «FollowTheRabbit».
- The «ct1.bin» is the encrypted data we want to decrypt using the container chain.
So we need to link the containers in order to let them talk to each others, taking into account that «weisse» and «ipa» use Prana & Eureka to communicate.
Note of the author: Juan told me that would be great to put a diagram in this place to improve the explanation, but… I’ll do it only for a beer. If you want a diagram just make me happy and bring me one! ;-P
UPDATE 23/11/2015: nibble provided this awesome diagram 🙂
This is what I did:
docker pull netflixoss/eureka:1.1.147
docker run -d --name eureka netflixoss/eureka:1.1.147
docker run -d -P --name porter schibstedchallenge/dockermaze-porter
docker run -d -P --name weisse --link porter:porter --link eureka:eureka schibstedchallenge/dockermaze-weisse
docker run -d -P -e "AES_KEY=FollowTheWhiteRabbit" --name ipa --link weisse:weisse --link eureka:eureka schibstedchallenge/dockermaze-ipa
docker run -d -p 31337:31337 --name stout --link ipa:ipa --link porter:porter schibstedchallenge/dockermaze-stout
And then I waited some minutes before sending the requests to the «stout» endpoint (due to the advice found in the «start.bash» file):
curl -v -X POST --data-binary @ct1.bin http://localhost:31337/gate --header "Content-Type:application/octet-stream"

OK, I was on the right path but unfortunately I was not attending the Dockercon :(. Fortunately after the con @nibble_ds sent me the key they were giving in the Schibsted booth (thanks sir!).

When scanned the QR code a snippet of ruby code appeared:
puts 'z4LufsdfTf{bNsfldpE'.bytes.map { |ch| (ch.ord - 1).chr }.reverse.join
After executing it you get the new key! («DockerMazeSecretK3y»).
We should be close, but when I tried again the same «curl» command but modifying the AES_KEY, the «ct1.bin» didn’t work as the encrypted message. Where could we get a new message?
I remembered the DockerMaze «escape» command that receives a parameter «ip». So I did a DNAT from my public IP to the 31337/tcp port of the «stout» (PublicIP:31337 -> PrivateIP:31337), and executed:
escape x.x.x.x
Where «x.x.x.x» was my public IP, and I got:
Trying to escape... Wait...
Hummm… Everything seems to be okay but you must be faster… 20.040787 seconds is too much
So we need to make something to be faster. After inspecting what part of the chain triggered more, the «weisse» component stood up as highly inefficient. The problem was in this loop when getting the rotors:
...SNIP...

BFBASE = 'aaa'

...SNIP...
def get_rotors(nameserver)
 rotors = []
Resolv::DNS.open({:nameserver=>[nameserver]}) do |r| ctr = 0loop do begin n = r.getresource("walzen-#{ctr}.dockermaze", Resolv::DNS::Resource::IN::TXT).data.to_i rescue Resolv::ResolvError break endbf = BFBASE.dup found_chunks = 0 rotors[ctr] = ''while found_chunks < n begin ck = r.getresource("walzen-#{ctr}-#{bf}.dockermaze", Resolv::DNS::Resource::IN::TXT).data.delete('"') rotors[ctr] << ck found_chunks += 1 rescue Resolv::ResolvError next ensure bf.next! end endctr += 1 end endrotors end
Most of the requested DNS entries were like these:
walzen-0 IN TXT "4"
walzen-0-aaa IN TXT "7b57e0a216b65a40534e4c8bcc787a8e5b3722657dcfb0d199950688ef0c718cbf1094bd0ff7d687c69cfba09d42caaa13d4cdb24f8f892877b4a91f596b2615"
walzen-0-aab IN TXT "6f48936c561d66625e31702143c2978ddaf19f60dcfd340e3b3c2b725404a820613ad369ae0a30a5b76de14d08d041337c02ceacbed5e7c3deee67ad7f63f529"
walzen-0-aac IN TXT "f3523e2746b1e524a48451ff1e5c92f6d796b9b89036c43d8ae8f486c7c1bc2ea601499e6eab81e383c0392c2d0514f0e9324af985507efa116a743523cb00fe"
walzen-0-aad IN TXT "1a68df6455c8ec914476fcc5808279f298ed3f5dbba7a3b54b250309d92f17a112b307db75eb1c2af8dd38e473d819afd2e2ea1be6c90b589aba5f470d18459b"
walzen-1 IN TXT "4"
walzen-1-aaa IN TXT "0ec8580062742e72c3d96fc76d4f21bacdf03887256bb7c9d42a27c5cb43e216405163e7a3427a071033ea3944899f88d63f83e41d91ad1a19b39c455c041294"
walzen-1-aab IN TXT "ac8ccfafe184de033afdf13ddcdfd27b8b86989e82d1ffbca99290fbc4a115c2eba05323be80060a30eeaed3689385148aa56e37a6bb4a1bef0db5bd34dbf846"
walzen-1-aac IN TXT "eddd05480c7df9c6d0b69b591eb48f7f20175022f4577170ab7ea78e77b04c5d4e029dbf47fa3e8d49e3d83b4b816999ecb178f561081c292f2b6097544136f7"
walzen-1-aad IN TXT "18a46635e9b9f6d756753cf35f65e0aac1266c7c5ba25231e5e60bce0f2cb82432da675a09132d5e9acafc76a8110155b2c04d1ff2d5fe73cce8966a79286495"
But some of them were not consecutive, leading to a lot of unnecessary failed DNS requests. For example:
walzen-9 IN TXT "4"
walzen-9-aaa IN TXT "3a8a13373496029d73b8d44e23147e947f45d5fd8640073f2ff7953858bb5ce076cfbef68860d8986a7a8fc8ad26d9d3f8fc9fee0e56ed65b14cb0fe84acc724"
walzen-9-aab IN TXT "299cda0f3001505a3caf0b99e2c380f3b532161aa861b2f00675dfa4d08da0ea550dcc53f581692a5bd6d119744272fac0b7db8c6210ffbc8bc9a166bacd9305"
walzen-9-aac IN TXT "a76f638943aae11d925d680948e4672dd252ab54495fc2caf27cf45133b65e7d6ba6820a1225398e214b274dbd00596efbefe6229e18473b20c56de3c135153d"
walzen-9-rzd IN TXT "644fe5f18583ebf9c62e1e1f7bc4ecdd44b4ce70a5086c4ad7579a17a9413e3171bfde11790c877704a2a3e8b32891369bb946e9ae2b2c1bcbe797781c90dc03"
So what I did is to edit the «db.dockermaze» configuration file to make them all consecutive and updated the docker image.
docker cp ./modified-db.dockermaze porter:/etc/bind/db.dockermaze
docker commit porter redsadic/dockermaze-porter:v2
docker run -d -P --name porter redsadic/dockermaze-porter:v2
And when I ran the «escape x.x.x.x» command again… Voilà!
Trying to escape... Wait...
You put the key in the lock and... the door opens!
Congratulations! You are out of the labyrinth!
Send an email with the following info to big.ideas+DockerMaze@schibsted.com:
- IP used to escape
- The token 'XXXXXXXXXXXXXXXXXX'
- Short explanation about how you escaped
Wohoooo! challenge solved! 😀
I would want to thank the Schibsted team because I really had a lot of fun with the challenge! Thank you guys! 😀
And that’s all folks!
UPDATE 23/11/2015: some easter eggs from the challenge authors :
- The hostnames are different kind of beers
- The STOUT endpoint is /gate because it implements a XOR (a logic gate)
- The IPA exposed port is :6060 or GOGO 😀
- The WEISSE (enigma) endpoint port is 1954, the year Alan Turing died
- Also the endpoint /turing is in honor of him, due to his contribution breaking enigma
- The DNS records where the rotors are stored are called «walzen-x-yyy». Walzen means rotor in german
- And…
- STOUT is the kind of beer that nibble likes less, this is why he did it in python (as a good python hater he is)
- IPA is one of his favorites beers, and he did it in go 😉
- WEISSE is other kind of beer he loves, for this reason it is ruby!
PD: looks like the https://challenge.schibsted.com site is down now. Too late if you want to play the challenge now ;(
UPDATE 23/11/2015:
PD: the challenge is now available at http://challenge.schibsted.com. If you wanna play, go for it!!!
Escalada de privilegios en sistemas Windows (I)
En esta serie de posts hablaremos de cómo realizar una escalada de privilegios en un sistema Windows, es decir, llegar a ser SYSTEM desde una cuenta de usuario sin privilegios.
En ocasiones la principal estrategia utilizada se basa en probar exploits para la versión de windows del objetivo, y aunque esto puede ser efectivo un gran numero de veces, queremos presentar una breve guía divida en fases que permitan al pentester realizar la escalada de privilegios de una forma ordenada, eficiente y probando diferentes vectores de ataque.
Remarcar que actualmente existen muchas referencias en Internet que tratan este tema siendo algunas de las principales las mencionadas a continuación:
- FuzzySecurity
- Encyclopaedia Of Windows Privilege Escalation – Brett Moore
- Windows Attacks At Is The New Black – Rob Fuller And Chris Gates
- Windows Privilege Cheatsheet
- Windows_Services – All roads lead to SYSTEM
- Windows privilege escalation
En nuestro caso queremos hacer una síntesis de ellas y explicarlas paso a paso, sin embargo, señalar que queda fuera del alcance de este post como conseguir la Shell en el sistema.
Aclarado todo, empecemos, tenemos una Shell en una maquina Windows, molto benne…¿y ahora que demonios hacemos?
¿Dónde estoy? ¿Qué es ESTO? – Information gathering
Bien, en estos momentos, disponemos de una Shell en un sistema Windows. Antes de lanzarnos al ataque y disparar a todo lo que se mueva, es esencial realizar la fase de Information gathering.
Lo principal es no obcecarse con ser SYSTEM, primero hay que conocer el entorno, cuanta más información se tiene del activo más fácil es detectar un posible fallo de seguridad.
Información general
Sin ninguna duda, lo primero es obtener la versión exacta de Windows (OS Version) y (OS Name) y información genérica. Para este propósito, se ejecuta el siguiente comando:
- systeminfo

- Otra posibilidad: systeminfo | findstr /B /C:»OS Name» /C:»OS Version» (ojo con los idiomas)

Ok, ahora vamos a saber como se llama el host, que aunque parezca no relevante, siempre nos puede aportar información o alguna pista.
- hostname

Finalmente, es el momento de saber con que usuario estamos logged en el sistema, a lo mejor ya somos admin y no hace falta hacer nada más, aparte de celebrar una gran fiesta.
- echo %username%

- whoami

Información sobre usuarios
Siguiente paso, todo sistema operativo tiene usuarios que lo utilizan, miremos que usuarios tiene nuestro objetivo:
- net users – net user $name_user

Vaya vaya Joe, además del usuario «Administrador» también existe el usuario «Nyanyi» que pertenece al grupo «Administradores»…..uhmm….interesante. Con este simple comando acabamos de ampliar las opciones de ataque.
Información de red
¿Está el host solo en el mundo? ¿en que red está? ¿con que máquinas habla?. Tener la respuesta a estas preguntas podría ser la puerta de acceso a otras máquinas del entorno, imaginar que se puede alcanzar el ansiado SYSTEM en esta máquina pero si dirigir el pentest a otras máquinas .
Por otra parte, es muy útil conocer que servicios están a la escucha en el activo,que conexiones hay con otras máquinas. Quién sabe, a lo mejor algunos de los servicios publicados es vulnerable…
Los comandos a ejecutar serían los siguientes:
- ipconfig /all
- route print
- arp -A
- netstat -ano


Nota: A partir de XP SP2 utilizar los siguientes comandos para obtener información sobre el Firewall de la máquina:
- netsh firewall show state
- netsh firewall show config

Información sobre los servicios
Hasta este punto, se ha hablado sobre cómo obtener información general del sistema, que usuarios tiene y que comunicaciones hay a nivel de red. Uno de los últimos puntos a tratar en esta introducción son las «tareas» o «servicios» existentes en la máquina.
De momento, sin querer entrar en detalle, un servicio no es más que la ejecución, en segundo plano, de un binario. Por lo tanto, hay 3 conceptos claves:
- Binario que determina que acciones realizara el servicio.
- Usuario que ejecuta el servicio.
- Los privilegios del servicio, por ende, serán los mismos que los del usuario.
Los comandos a ejecutar para obtener la información relacionada con los servicios son los siguientes:
- schtasks /query /fo LIST /v | more (tareas programadas)

- tasklist /SVC (servicios relacionado con su proceso)

- net start

- sc queryex type= service state= all | find «$_NAME» (hablaremos más adelante de este comando (thanks P4chul0).
Conclusiones de la fase I
Con toda la información que hemos obtenido es el momento de realizar una primera iteración con el objetivo de lograr System, o en su defecto, un usuario administrador.
Pruebas a realizar:
- Tenemos el nombre de los usuarios, a lo mejor, hay alguno de ellos sin contraseña o que ésta sea su mismo nombre. O inclusive, que la contraseña sea el nombre del hostname….por qué no?.
- Se puede buscar su nombre de usuario en Checkusernames con la idea de obtener aún más información de redes sociales.
- Probar los usuarios en otras máquinas de la red.
- ¿Hay algún servicio publicado vulnerable?
- Imaginar
Si nada de esto funciona, pasaremos a la fase II. Es esencial recopilar toda la información obtenida en esta fase, porque cualquier dato obtenido puede ser la clave que nos ayude en procesos futuros más complejos, por ejemplo, la búsqueda de un exploit o una reverse shell por un puerto que no este cerrado por el firewall…
